I still have not gotten the projector mounted to the ceiling in the sewing studio here at Stacey Sansom Designs. There are a lot of things to consider before we make it a permanent fixture in the room.
I know a lot of you are still wondering what all the fuss is about, but I hope you will begin to understand how this single tool can increase your sewing efficiency dramatically once everything is properly set up and calibrated.
Please remember that I am still learning this myself so I do not have all the answers, but I do know how to dig very deep into the research. I can help you do the same if you follow along with me.
What considerations?
The biggest considerations to keep in mind when choosing to switch to a projector for sewing is “WILL IT WORK” for your given your individualized circumstances. I cannot know all of these. I do know, that circumstances can and do change. Flexibility is a big deal for me when making a decision like this.
Things to consider include:
- Location
- Ceiling height
- Flexibility
- Cutting location
- Budget
- Technical skills
I won’t touch on each of these in depth, but I think that they are important to mention.
What conditions do you have to work with? Here at Stacey Sansom Designs, I have a few things to consider such as the
- high ceilings and accessibility.
- 60-inch ceiling fan in the middle of the room.
- room is open to below on 2 sides and the projector light could be a problem to those in the room below.
- lighting concerns with big windows and the room being open to below on multiple sides.
- sound concerns because projectors are notorious for being on the noisier side.
- airconditioning/furnace intake and output vents in the room.
- required walking spaces due to the location of the room at the top of the stairs.
- large equipment already in the room that is harder to workaround.
- height preference of the cutting table to reduce back strain.
- future equipment or furniture upgrades or changes.
For me, the budget was a concern but not a limiting factor. For some things, I am willing to spend more to make sure that it will work for what I need and want. I am blessed that I have a husband that agrees with this and allows me to weigh the factors that are pertinent to me.
Technical skills were not a concern for me because I live in a house full of technology geeks so if I am not able to figure something out, I know that someone that is genetically related to me will be able to step in and close any gaps in understanding. My boys have been very helpful. I think that they want to see how it works.
Location is not a concern to me because I am fortunate to have my own sewing space. There are some restrictions that come with this due to its location, but for the most part, this is my space to use as I need to for sewing purposes.
However, some of my biggest factors were things that I could not change easily. These included the location of the vents on the ceiling (not movable), the ceiling fan in the middle of the room (not movable), and the 12-foot long-arm quilting machine that only fits in certain places in the room.
There were things that were adaptable, but not things that I desired such as blackout curtains on the large windows (they have blinds already) and potentially finding a way to close off the room below (potentially interfering with airflow in the house).
I like my cutting table waist height so that I can reduce back strain. I have not always had my cutting table as high, but over the years I have raised it and found the current height is the most comfortable for me. This was a negotiable height, but it was one that I was not willing to change if we could figure out a workaround. To counter the cutting table height problem, I am blessed with high ceilings in my sewing room but the question became “is it high enough to make up the difference?” As you read in the previous post, it was not quite enough ceiling height for the projector selected.
Testing the potential solution
Once I decided on the rough location in the room, it was time to test the projector in the environment it would live in. Of course, I did not want to make anything permanent if it was not going to work there. The solution–reverse testing. Remember that I previously tested on the wall to verify if the throw distance would work for my use case.
Fortunately, I have boys that are willing to help me out from time to time. Playing with technology is fun, except when the work to be done is just outside your reach while standing on a chair above your head.
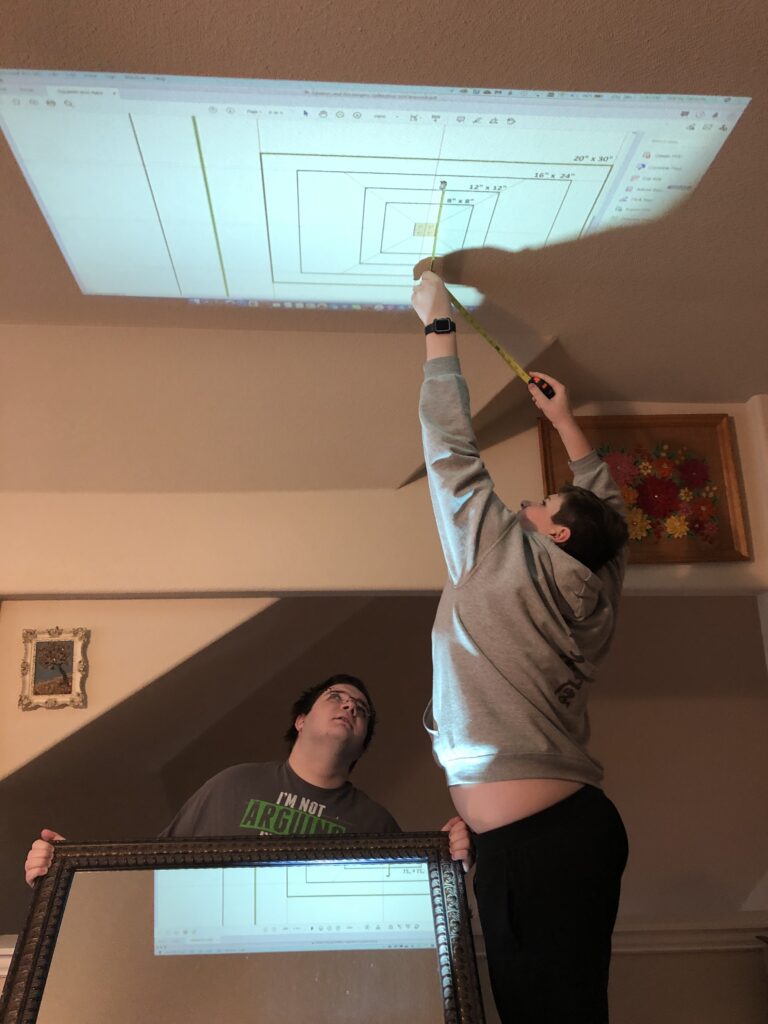
In the above picture, you can see us REVERSE TESTING the projector and mirror method of installation. The one kindly held the mirror and risked burning his corneas with the projector pointed right at him. The other climbed on a chair with a tape measure and measured.
We did not use anything fancy. A standard-issue hardware store tape measure and a standard-issue vanity mirror. This is not a fancy mirror. This is a mirror we had on hand, right off the wall in the half-bath.
The size of the mirror required for this is a bigger mathematical problem that I will leave to my husband and oldest son.
This method allows you to bend the projected rays and thereby allow you to increase the distance between the lens and the projection surface.
As I said, the math is bigger than my physics grasp, but the concept is fairly simple. There is a required THROW DISTANCE required for the projector. For mine, it is 66-inches. Give or take. If you take that distance and subtract the distance from the projected surface (the cutting table) to the mirror, the difference is the minimum distance you need to mount the lens from the surface of the mirror.
The most important things from a “projectors and sewing” standpoint are
- The mirror must be mounted directly above the cutting surface.
- The mirror must be mounted at a 45-degree angle to the projector lens.
- The longer the throw distance the larger the projected image.
Now please keep in mind that our testing here was in reverse. We did this so that one did not have to stand with the mirror above their head at a 45-degree angle and the other didn’t have to stand with the projector above their head while I tested the calibration measurements. This was only for concept testing to answer the question “will it work?” Our measurements were rough because it is hard to hold a mirror perfectly still and it is hard to reach that far above your head. Note that not once did either of them volunteer to bring the step ladder upstairs.
The findings
This test was a success!
The test proved that the mirror would make up the difference (and then some) of the required throw distance required to get my projector (Bomaker Parrot I) completely in focus.
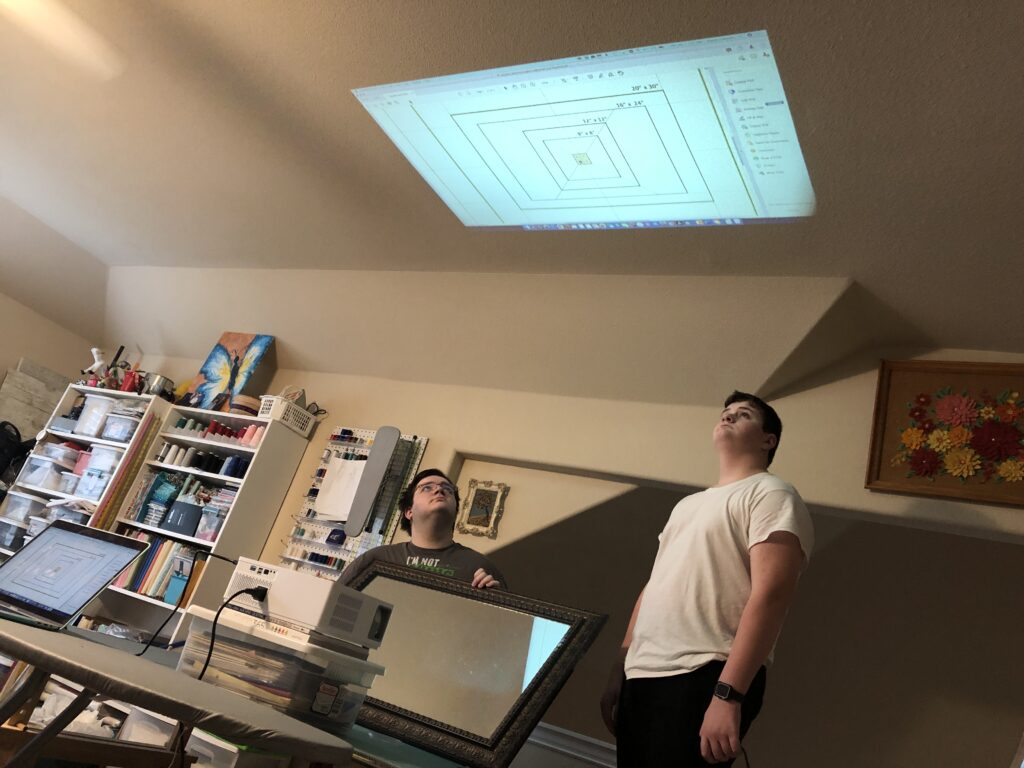
The projection you see in the image above is roughly the same size as my cutting table also pictured.
I personally feel that this was more successful than I expected because the resulting projection was the size of my table (roughly) and it was larger than your traditional A0 paper size that most PDF patterns are done in.
A side bonus of this test is that you can see that the projection is plenty bright in spite of the amount of natural light coming into the room (mid-day) even with the blinds slightly open. The LED lights from the ceiling light also have little impact on the visibility of the projected image.
The fact that the room is open to below on two sides of the projected area had no impact as previously expected.
It was very evident that I am going to need a lot of extension cord to plug in the projector once it is mounted to the ceiling. That is the cheap and easy option. The other option is to have an electrical outlet installed in the ceiling. That is not out of the realm of possibilities, but I have not looked further into the cost either.
Testing connectivity
Having the projector and having it properly mounted is only part of using a projector for sewing. You have to be able to connect to it in order to use it. The good news is that many projectors do have built-in Wi-Fi capabilities or other streaming options. You should probably select one of these if you have zero technical skills.
The Bomaker Parrot I projector does not have either of these options built-in. This required us to set up and test the devices that were purchased to help remedy this shortcoming if you want to call it that. I have several options at my disposal. We tested those that were quick and easy to connect to the projector.
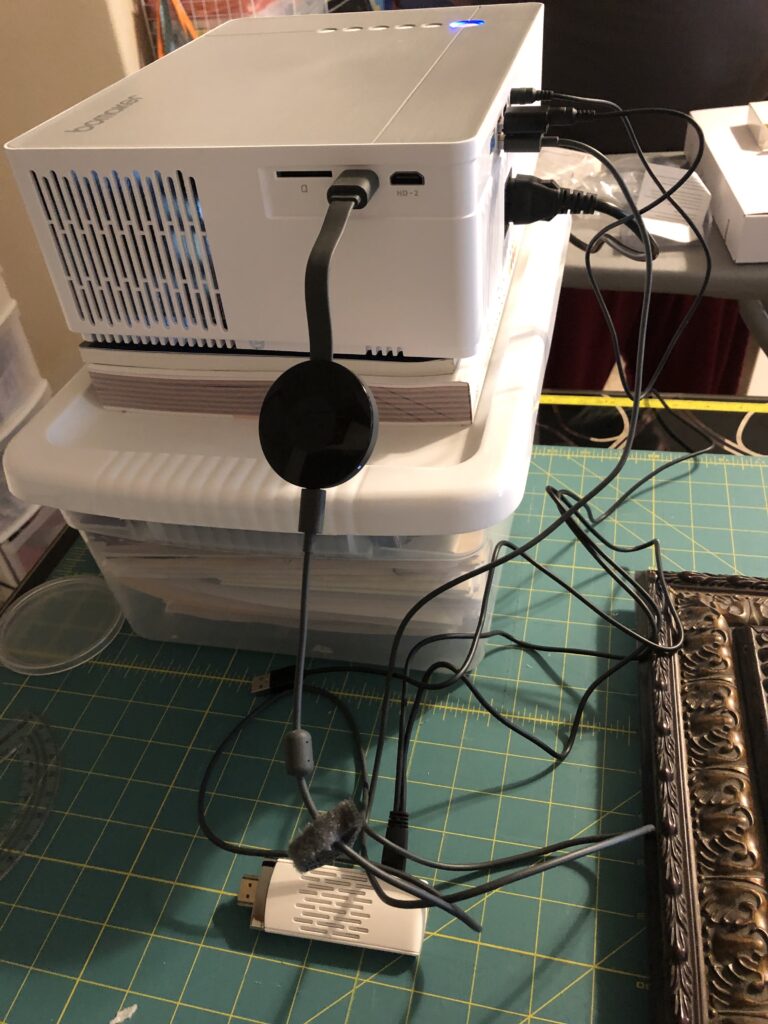
For this test, we did not have to have it projecting on the mirror. As you can see in the image above, we simply stacked up some items that were on hand and pointed it at a wall. We focused it and set to work testing.
The original test was done with the project connected via HDMI cable to HDMI to USB-C connector to the computer. That for sure works. In the worst case scenario, we run a very long HDMI cable from the project alongside the power cord. That is not ideal, but workable.
We tested the following devices for connectivity
- Bomaker Wi-Fi adapter
- Bomaker Bluetooth adapter
- Google Chromecast
- Mac Mini
The Bomaker Bluetooth adapter was a complete bust. It was only designed to send audio. That device was returned.
The Bomaker Wi-Fi adapter was a bust for a couple of reasons. The device itself did in fact work, I was able to connect to the projector wirelessly and project the screen onto the wall. It could even be calibrated as expected. There was no noticeable difference in the size of the projection wirelessly using this device or using an HDMI cable. That was an excellent outcome as some setups suffer from scaling differences using different connection methods. I plan on keeping my PDF patterns on a shared drive because I can then use them on any device and I simply do not have a lot of excess space on my computer hard drive. The problem was that I could connect to the projector or I could connect to the internet based storage drive. I could not do both. Big disappointment. We could not figure out how to get it to do both. It was not a complete “no” because it did work to allow me to use the projector for the purpose I needed. It was not a complete “yes” because it would not allow me to use the internet while using the projector.
I have an old Google Chromecast. That is not the problem. I already knew going into this test that I have always had problems maintaining a consistent and reliable connection to the Chromecast device. It works for me when it wants to, not necessarily when I want it to. After restoring the device to the factory settings and updating it, I did get it to connect to the projector with my iPhone or my computer, but it was not a reliable connection. There are probably things we did not weigh when testing this such as network settings, etc. I did not like how it made me download the Google Home app in order to connect to the device. I only need to connect to it and the projector, not to every other device in my house. That was actually a ding against it for me. The lack of reliable connection was another ding. It could potentially still work. Also devices not Apple branded tend to work with the Chromecast a lot better so you have to keep your use case in mind when deciding on this option.
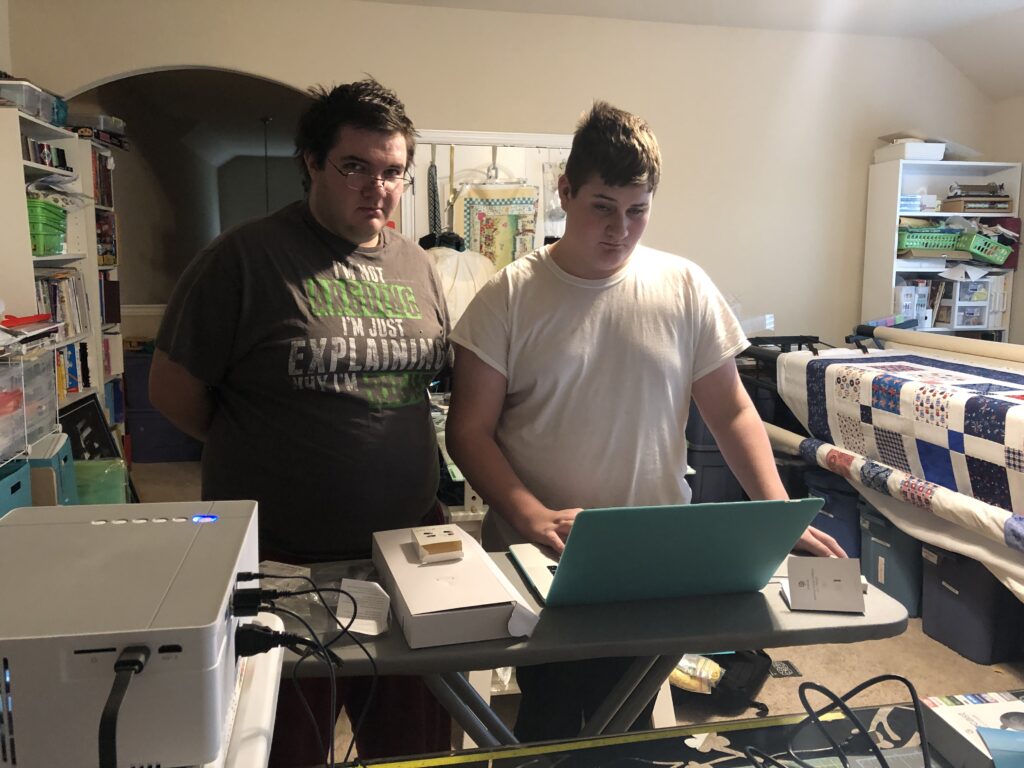
The middle son giving me technical advice on possible options while his brother researches physical devices.
I love that the boys worked together to help me figure out different options. The technical side, I know but only in theory sometimes. Application can be a bit harder even if I know it should work in principle. The middle child is great for coming up with creative suggestions for making things work. The youngest was researching alternative devices.
The brainstorming was to see if we could get something that would allow me to maintain all functionality of the projector, the internet, and my computer.
That is where the Mac Mini came into play. We already own it. It is not used often except to store pictures and other misc stuff. It is a device we have on hand and honestly it would not be missed if it was removed from its current location.
The Mac Mini test was the option that firmed up the “no” on the Bomaker Wi-Fi adapter. It was returned after testing with the Mac Mini. With a little work, the Mac Mini could be mounted up with the projector. It would also require some form of power extension but it can be connected directly to the HDMI port on the projector without any problems. I can then use a screen share to connect to it OR use a wireless mouse and keyboard (which we already have) and just navigate the Mac Mini with the projection as the screen. Flexibility. Options. Cheap. Available.
The other option was the purchase another Apple TV streaming box. That would be an upgrade for the family streaming services (no Cable here). It would not be the cheapest option. The device would also have to be mounted up with the projector, but it is smaller. The power would be an issue that can be solved easy enough.
Wrapping it up
No final decision has been made yet.
My husband wants to build some sort of all-in-one “box” to mount to the ceiling that can hold the mirror at the correct angle and hold the projector.
The discussion about the size of the mirror has happened. It is possible to use a basic mirror tile from the hardware store, but no definitive size has been declared yet. My husband did want to check into high-quality optical mirrors to get me the best possible resulting image. The decision on that has not been made.
There was discussion about making the set up adjustable. That opened a discussion about what other factors I could possibly want to work around. I want options. What can I say? Flexibility is important in an ever changing technology world.
I want the ability to change the size of the projection with the size of my cutting table. If I buy a cutting mat to completely cover my existing table, it will be custom cut or specialized. The price is pushing $200 or more. If I change out the tabletop for something a bit larger, I can get a variety of options at JoAnn on sale (or using a coupon) and save a bit of money. Their regular prices are under $100. Did I want to change my tabletop? That would reduce the available throw distance a touch (1-2 inches depending on the thickness of the tabletop). I am not ready to spend a lot of money on this initially, so changing the tabletop and ordering a new cutting mat are someday wants.
The good news is that we have since tested the built-in zooming features on the projector and the installation method does not have to be as adjustable as originally thought. I can plan for the largest cutting mat size I want. I can account for the change in tabletop thickness and how it will affect the throw distance. I can use the zoom feature on the projector to reduce the projection size to fit the existing cutting table without losing quality or the ability to calibrate the projector. I just need to figure out how larger of a mat I can reasonably use in the space in the room.
This projector will be mounted to the ceiling eventually. Soon, I hope. I will update as we make more progress on this.
